Food Friday: Chicken Laksa

Posted by Lipglossiping On September - 6 - 2013

I first discovered the joy of Laksa courtesy of an inner-city food court almost 15 years ago.  I was living in Sydney at the time and alternating my lunches between New York Style pastrami sandwiches, Lebanese Fattoush, and Singaporean Chicken Laksa.  Such was the multi-cultural diversity of the city, coming from the British countryside, it was a revelation to taste my way around the continents in such an informal setting.  When I returned, I really missed some of my favourite dishes, and the first one that I had to learn for myself was the Chicken Laksa.

Now, back then… it was practically impossible to find a ready-made Chicken Laksa paste.  There are billions of recipes online describing how to make your own but nowadays, I just buy a jar of paste from my local Asian supermarket – tastes great and much less hassle.  I believe that some mainstream supermarkets stock it now, I’m pretty sure Sainsburys do anyway.

Chicken Laksa is a great dish to serve up when you’re looking to impress.  It’s a warming taste sensation, constructed around a base of chilli and coconut milk, you can customise it to suit your taste for spice just by adding more or less paste.  Not only that but it takes a mere half an hour to put together.

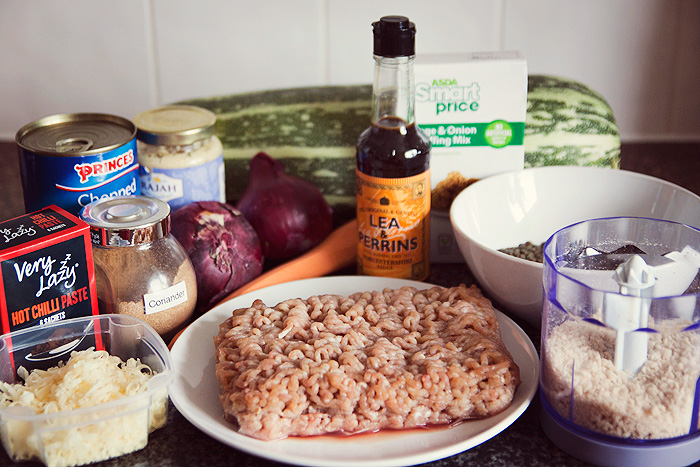
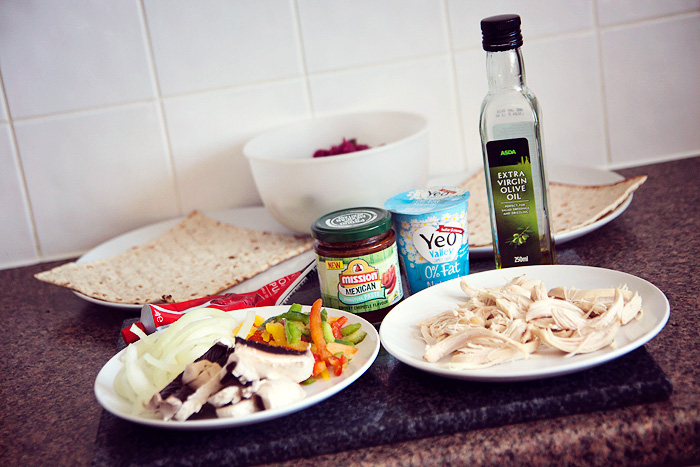
And this is what you need to do it…

Chicken Laksa

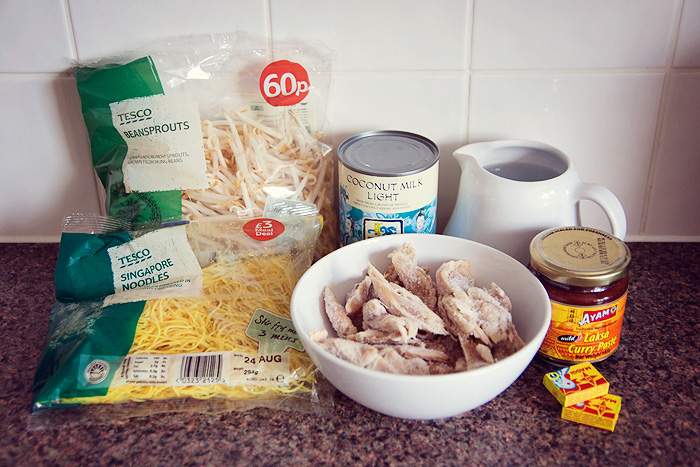
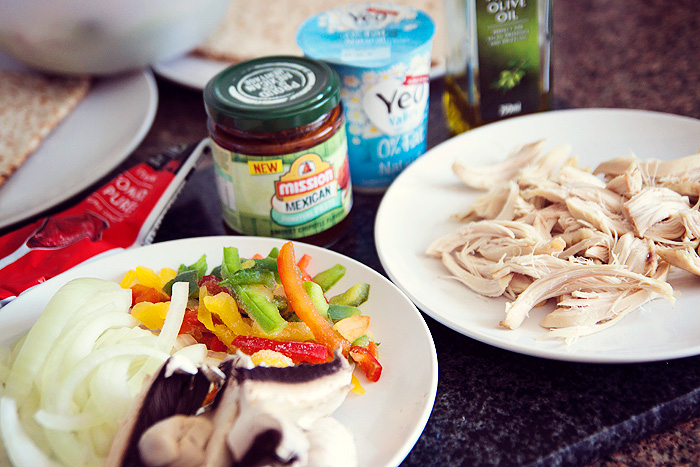
Not too many ingredients at all huh?  Just the way I like my cooking!  The above serves 2/3 people.

1 large fresh chicken breast/frozen chicken pieces – I used the meat that I’d pulled from a whole roasted bird after cutting off the breasts.
1 bag of bean sprouts (I use about half a bag for 2 people)
1 bag of noodles (traditionally vermicelli noodles but I’ve used rice, egg, whatever!)
1 can of coconut milk
Roughly 500ml water or chicken stock.  If you’re using water, add some chicken oxo-type cubes to the pan during cooking.
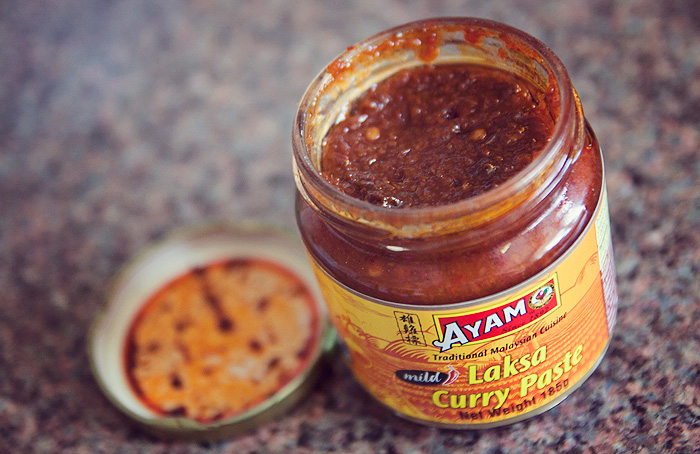
1 jar of Laksa paste (My favourite brand is Yeos – I use a whole jar but this will make it hot, for a milder version, use half a jar)

Apologies that my list is a little vague in terms of quantities, this is one of those recipes that is best judged by the eye as you go along… honest!

Chicken Laksa2

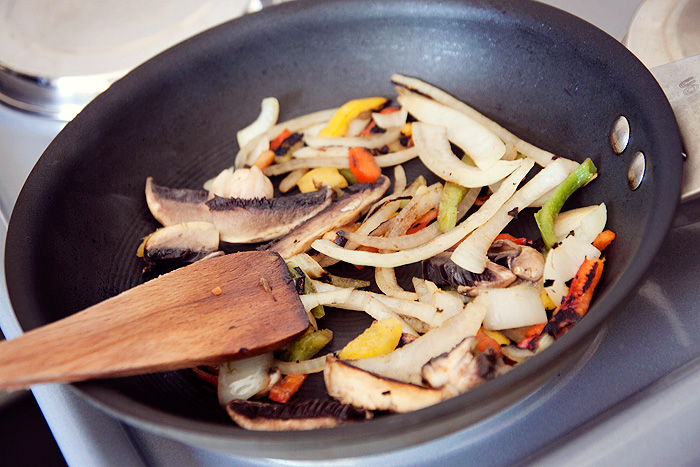
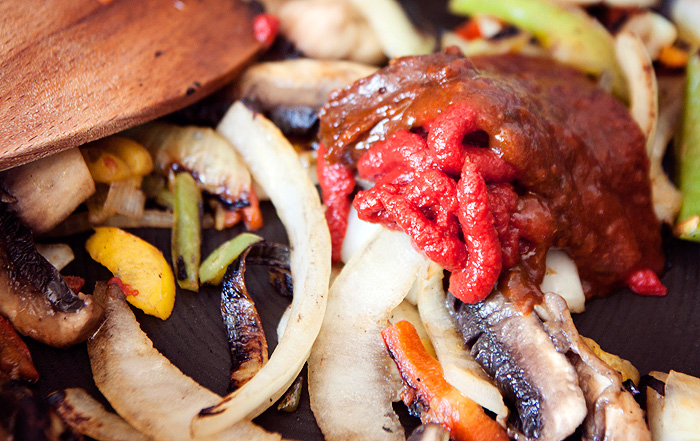
Grab a large saucepan or stockpot and add the paste, coconut milk, water+oxo cubes/stock and the chicken.  Bring to a simmer, put the lid on and stir occasionally until your chicken is cooked through.  How long this takes will depend on whether you’re using raw, pre-cooked, or frozen (pre-cooked) chicken… err on the side of caution and make sure the chicken is fully-cooked/heated to safe temperature.

I usually give it a good 15-minutes bubbling away for pre-cooked, frozen chicken.

Chicken Laksa3

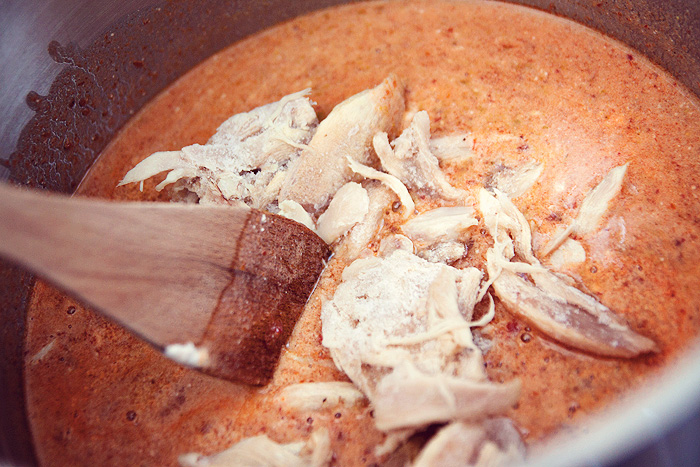
Take note of the water levels and at this point decide if your “soup” is thin enough… if it feels a little too thick, add some more water.

Chicken Laksa4

Throw in your noodles and bean-sprouts and cook for a further 5-minutes before serving.

Chicken Laksa5

Chicken Laksa6

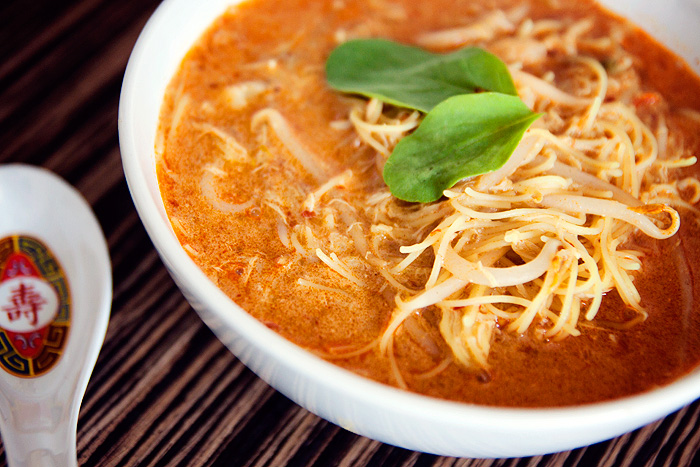
Done!  How easy is that?  And even though I do say so myself, it looks pretty impressive!

I usually serve it with some crusty bread… completely not traditional.  Not bothered either.

One of the best things about Laksa though is just how versatile it is.  If you’re vegetarian, use tofu instead of chicken (although remember to check the paste ingredients, they vary).  If you don’t like chicken, use king prawns instead!

Have you ever made a Laksa?  What’s your favourite way to cook it?


Food Friday: Stuffed Marrow (just like Deirdre used to make)

Posted by Lipglossiping On August - 30 - 2013

If you’re British and don’t get the popular cultural reference in the title, shame on you.  If you’re not British, and do… you’re amazing!

When I was at my local farm food shop last week I spotted a barrowfull of marrows, they were selling them off at 60p-a-piece.  I’ve never had marrow before, stuffed or otherwise… at 60p, I felt that I couldn’t go wrong.

I googled for some recipes but decided that I’d go for the old tried, tested, and somewhat derided route of stuffing it.  Instead of cutting the marrow into two long “boats”, I decided to slice them into 1.5″ thick rings and stuff the middle of those instead.  To my eye, it just looks a little more modern.

The great thing about marrow is that… it doesn’t really taste of anything.  You might think that this isn’t such a selling point, but it absorbs the flavours of whatever you combine it with beautifully.  I felt that combined with the stuffing mix I prepared in the recipe below, the marrow tasted a little like fluffily boiled potatoes (but without the uber-carbs!).  A truly delicious meal.

The recipe below makes enough stuffing mix for the amount of marrow you see in the photos (6 slices, not whole) with enough leftovers to stuff a further two large peppers.  It’s great for cooking up on a weekend and refrigerating a portion for later on in the week.

Stuffed Marrow_1

You’ll need:

500g turkey mince (or any mince you prefer to use)
85g sage & onion stuffing mix
1 marrow
2 onions
1 carrot (shredded
1 tin chopped tomatoes
a glug of worcestershire sauce
1 tsp chilli paste (or chilli powder)
1 heaped tsp of garlic paste (or a couple of cloves)
1 lvl tsp ground coriander
1/2 tsp cayenne pepper (not pictured)
100g green lentils
Water

1 pitta bread broken into breadcrumbs (I prefer the crunch pitta bread gives)
60g grated cheese

Stuffed Marrow_2

Rapidly boiling the lentils for 10 minutes before turning the heat down and continue to simmer for around 30-minutes.

Stuffed Marrow_3

Fry off the turkey mince (I used a couple of sprays of frylight to coat the pan first) and add your spices (coriander & cayenne pepper).

Stuffed Marrow_4

Add the onions, carrots, garlic paste, and a good glug of the worcestershire sauce and allow to simmer for a couple of minutes.

Stuffed Marrow_5

Pour the chopped tomatoes and stuffing mix on top and stir to combine the stuffing mix.  Have a jug of water ready, you’ll need to topup the pan as the stuffing mix absorbs the liquid. You can use a stock cube in the water but I didn’t have one to hand and it was fine.

Stuffed Marrow_6

As your mince is cooking away in the background (keep checking it for water levels, you want it dry-ish but not enough to stick or burn!), it’s time to prepare your marrow.  Marrow might seem like an awkward vegetable to prepare but it’s incredibly easy.  Simply slice of 1″-1.5″ thick pieces, as many as you need.  Using the tip of the knife, cut out the middles and discard.

Stuffed Marrow_7

They should look like the above photo once you’ve finished.

Stuffed Marrow_8

Drain your green lentils once they’ve finished cooking and add them to your stuffing mix, combine well.

Stuffed Marrow_9

Take a baking tray, a sheet of greaseproof paper, and your Frylight spray.  Place the empty marrow rings evenly onto the greaseproof paper and fill with your stuffing mixture.  The mixture will shrink down a little as it bakes so make sure that you fill them generously!  Top with the pitta crumbs and grated cheese.  Lightly spray the rings with some Frylight and pop into a pre-heated oven (200°C/400°F/Gas 6).

Loosely cover the baking tray with foil, try not to let the foil touch the top of the rings (or your cheese will transfer!).  Bake for around 30-minutes, remove the foil and pop back in the oven for another 10-minutes until the top is browned.

Stuffed Marrow_10

They should come out looking something like this!

Stuffed Marrow_11

For me, these are a whole meal in themselves… they don’t need anything to accompany and three slices of stuffed marrow was incredibly filling.  Some people are happy to eat the skins, I didn’t like the texture so sliced mine off just before eating.  Either way, don’t peel your marrow before you cook it, the skins hold everything together!

I do hope you try this one while marrows are still in season.  It makes for an incredibly cheap and filling meal, healthy too!

* Weight Watchers – I pointed this recipe at 9PP per portion for the minced stuffing mix (the whole recipe makes 4 portions of stuffing mix)

Food Friday: Diet-Friendly Eggs Benedict!

Posted by Lipglossiping On August - 16 - 2013

I can take or leave breakfast. I know you’re supposed to eat it religiously… that it kick-starts the metabolism for the day. What is it they say? Eat breakfast like a king, lunch like a prince, dinner like a pauper… blah blah blah…

The thing is, I just don’t feel remotely hungry upon waking. It takes me a good hour or more to be able to face the thought of food.

Unless you put this infront of me.

IMG_2209

I die for a dippy egg.

Truth is though, I can’t poach eggs for shit. I’ve tried, oh… I’ve tried so many times. With vinegar, without vinegar… eggs so fresh, they still feel warm. A whirlpool in my pan that would sink a battleship… I just can’t do it. Praise the lord for silicone egg poachers, that’s all I can say.

I call this version of Eggs Benedict “diet friendly”… and it’s not actually too bad for the waistline. I make a cheat’s version of hollandaise, I don’t have the skillz for a real, homemade version and this one is far lower in fat than the proper, gourmet treat. I’m also the only one in the house who actually likes Eggs Benedict so it doesn’t make much sense to keep a jar of hollandaise in the fridge, I just wouldn’t get through it (without a very big spoon and a lack of shame).

Anyway, if you want to indulge in a weekend breakfast treat… stick with me, and read on…

IMG_2169

You’ll need:

1 crumpet or muffin (mine are cool square-shaped ones from Asda)
2 slices of wafer thin ham (or bacon if you’re a fatty)
1 whole egg
1.5 Tbsp low-fat mayonnaise
A squirt of lemon juice
1/4 tsp mustard (I use whatever I have… I’ve made it before with english, dijon, and wholegrain… I like the texture of wholegrain)
1/2 tsp melted butter
A pinch of cayenne pepper (optional)

IMG_2178

Bring a pan of water to a boil before turning down the heat slightly. Spritz your silicone egg poacher with a couple of sprays of oil (frylight or similar) and crack your egg into the well. Place your egg poacher into the pan and cover, set a timer for 5 minutes.

IMG_2181

Meanwhile, toast your crumpet or muffin….

IMG_2184

To make the “hollandaise”, melt the butter into a ramekin and add the mayonnaise, mustard (whichever types you’re using), and cayenne pepper. Mix well.

IMG_2187

IMG_2189

Add a little squirt of lemon juice (to taste). This helps to mimic the hollandaise tang nicely.

IMG_2191

Because this is a “healthy” version, I don’t butter the crumpet but instead use a teaspoon of the “hollandaise” to coat the toasted muffin/crumpet…

IMG_2195

…before adding a couple of slices of wafer thin ham.

IMG_2206

By now, your timer should be beeping! Add the poached egg and top with the remaining “hollandaise” and a shake of black pepper.

Enjoy!

What’s your favourite breakfast treat for the weekend? Will you give this one a go?

Pick your own!

Posted by Lipglossiping On August - 13 - 2013

I haven’t been strawberry picking since I was a small child, no doubt eating far more as I went along than ever made it into the basket.  In fact, I remember it being so much fun, I don’t know why it never occurred to me until now to take Leila, she’s an absolute fruit fiend (having hated vegetables from day one) and loves to feel “in control” of preparing her food.  A match made in heaven.

As far as I’m aware, there’s only really one major strawberry picking field left near us… we used to have one just down the road from my old house but it got carved up and used as a car boot field many years ago.  If you’ve never tasted pick-your-own strawberries, you’re truly missing out.  Sweeter, juicier, and far more tasty than the bland versions the supermarkets stock… they’re an absolute joy.

IMG_2006

There were marrows bigger than my bum!

IMG_2011

Strawberries as far as the eye could see

IMG_2014

IMG_2017

IMG_2022-2

The queen of strawberries

IMG_2024

IMG_2030

Incase you’re wondering, she’d made the crown that morning… wasn’t giving it up.

IMG_2025

“Leila! Don’t eat them, we’ve not paid yet!”

IMG_2032

“You took my stwabwees off meeeeee!” (hush you, dwarf bean!)

IMG_2036

IMG_2041

Winning!

There should be a couple more harvests left before the end of the month (and then it’s blackberry season!)… if you haven’t picked your own summer fruits yet this year, what are you waiting for?

Savse Smoothies for a DIY Juice Cleanse?

Posted by Lipglossiping On July - 24 - 2013

I’ve seen a few Savse Smoothie posts pop up on blogs recently and while I try to avoid blanket campaigns, I was really intrigued by the idea that these could perhaps be used as a short-term and less expensive solution to a DIY Juice Cleanse.  Firstly, you might be a little ambiguous on what actually consititutes a juice cleanse in this context…

Well, for me… I took part in an expensive, but effective cleanse last year that really worked a bit of magic to hydrate and plump my skin, boost a natural-looking glow (and lose a bit of weight!).  Of course, the weight loss didn’t last much longer than it took me to inhale a bag of salty chips the next day… but, at the time, it went a long way to helping deal with some water retention.

A “professional” 5-day cleanse can cost in the region of £350 and usually includes all of your juices, some form of nut milk, perhaps a mild laxative, and usually a few skin-boosting supplements to help you along your way.

Savse Smoothies_1

These Savse Smoothies* retail at £2.49 for a 250ml bottle.  Most “pro” cleanses provide juices that come in 500ml bottles… the average dose of which is around three-to-five bottles a day.  Taking this into consideration, you could feasibly subsitute Savse Smoothies (the ones that don’t contain yoghurt) at a cost of £15-to-£25 a day.  Over the course of 5-days?  £75-to-£125 depending on whether you choose to consume 1.5L or 2.5L of juice daily.  Either way, don’t forget to supplement the juices with plenty of water, coconut-water, and herbal teas.  A glass of almond milk before bed would also provide a dose of protein and good fats.

Now, while this of course, still sounds expensive… it’s nowhere near the £350 end of the spectrum, is it?  Of course… if you’re a regular juicer, you’d end up saving plenty of money just by investing in something like the soon-to-be-released Philips HR1863 Viva Collection Juicer.

The Savse Smoothies contain 100% natural ingredients… for example, their Super Green offering delivers the following in each 250ml bottle:

150ml Pear (juice)
80ml Broccoli (purée)
5ml Kiwi (pulp)
5ml Lemon (juice)
5ml Banana (purée)
4ml Kale (pulp)
1ml Spinach (juice)

Add up those totals?  You get 250ml.  That’s it… there’s nothing else added to detract from the fruit/veggie goodness contained within.

Savse-Smoothies_4

If you are contemplating a juice cleanse with these Savse Smoothies, I would recommend doing some homework online to discover some useful additions to help encourage the best detox possible.  Picking up some supplements from Holland & Barrett such as Spirulina Capsules/Powder, Psyllium Husk Capsules, perhaps a mult-digestive enzyme capsule to encourage the break-down of residual matter in the stomach will go a long way to increasing the successes of your cleanse.

Of course, if you do undertake something like this… do it carefully and watch out for signs of dehydration, it’s amazing how much of the liquid our body needs comes from the food we eat and not the drinks we consume and only do something like this for 3-5 days at the most.  If you have any underlying medical issues, always consult a doctor first.

Alternatively, you could use these Savse Smoothies as a nutritional boost!  “Drink your greens!” as they say… the Super Red/Green/and Purple juices in the range contain 2 of your 5-a-day.  If your skin is suffering because you’re not a veggie fan… treat a bottle of this like your medicine, bottoms up!

Either way, I’m a fan of the concept.  At £2.49, they’re not prohibitively expensive and the convenience speaks for itself.  The only downside to these is avaiability.  Right now, outside of London… supply is pretty sketchy.  Log on to savsesmoothies.com to find your nearest stockist.

Do you juice cleanse?  Get enough of your 5-a-day?  What do you think about Savse Smoothies?

* press sample

A DIY Graze Box for less than half the cost!

Posted by Lipglossiping On July - 12 - 2013

I’m a massive Graze Box fan.  Like a child on Christmas morning, I skip toward the front door when I hear the postman coming every alternate Friday.  *Plop!* as the box hits the doormat, *Squee!* as I grab it in my hot little hands and run off to uncover my weekend treats!

What is it about cutely packaged boxes that suddenly makes the interior of Holland & Barrett look sexy.  There is nothing sexy about Holland & Barrett… or Julian Graves for that matter, probably why they went bust.

Are you one of the few remaining people on Earth who doesn’t know what a Graze box is?  Allow me to enlighten you…

A DIY Graze Box for less than half the cost!

A DIY Graze Box for less than half the cost!

Thai Crackers with Sweet Chilli Sauce | Biscuit with Compote | Florentine Mix | Popcorn

You pay a fee of £3.89 and for your monies, you receive a wee cardboard box delivered to your door, or office… you know, if you have one.  The box contains a selection of four tasty treats, supposedly healthy (usually somewhere inbetween healthy and fattening), definitely moreish.  You can log on to the website at Graze.com and tell them what you like/don’t like… even rating the previous box so that future selections are customised to your taste.  Back in the day, they used to include fresh fruit and other lovely bits in their boxes but what with Royal Mail being shit and letting the fruit ferment… they had to stop all that.

There are a billion offers around for you to try your first Graze box for free, mostly because subscribers get given codes to refer friends and earn themselves money off future boxes.  Here, have mine: 616XG25D for a free box*.

They’re also now doing Breakfast boxes containing four portions of suped-up porridge… usually with things like dried fruit and nuts added, plus a drizzle of honey.  Yum.  Again, ZXRP1YM will get you into the top-secret (not really) Breakfast Club and award you your first box for free*.

…BUT YOU’RE NOT GONNA WANT TO USE THEM!

Because look, I done did my very own Graze Box.  A DIY Graze Box!  And it cost not THREE POUNDS AND EIGHTY-NINE PENCE.  Oh no, it cost a mere £1.67** and contains lots more goodies!

A DIY Graze Box for less than half the cost!

A DIY Graze Box for less than half the cost!

A DIY Graze Box for less than half the cost!

Garibaldi Biscuits | Mini Flapjack | Breadsticks, Cheese & Chutney

Meringue and Yoghurt-coated Strawberries | Florentine Mix | Roasted Chickpeas & Wasabi Peanuts

My favourite thing from my delivered Graze boxes has always been the Florentine mix of pumpkin seeds, cranberries, and dark chocolate buttons so I knew that I wanted to replicate this in my own version (bottom middle).  Infact, this worked out as the most expensive pot (56p), which might have something to do with the fact that I used Montezuma’s Giant Dark Chocolate Buttons (om nom nom).

Garibaldi biscuits (top left) are a much-neglected biccie in my opinion!  On Weight Watchers, you can have three for 3PP… plus they’re pretty inedible without a cuppa but perfect for dunking, making them a brilliant mid-afternoon, tea-break snack.

I wanted an even spread of sweet vs. savoury, so also included a mini-flapjack bite from Asda bakery (top middle)… now I just need to resist the temptation not to polish the rest of them off!

Leila’s passion for breadsticks got me thinking about their potential for grazing on (geddit?), so I picked up some mini wholewheat breadsticks, a jar of tomato chutney, and a Babybel Light (top right).  It’s like a cheese and pickle sarnie in skinny form… um, sort of.

The bottom left selection is another for my sweet tooth.  It features a broken meringue nest and yoghurt-covered dried strawberry pieces!

Finally, I included a pot with a comination of dry-roasted chickpeas and wasabi peanuts (bottom right).  So spicy, so good!

Obviously the initial outlay to make your own Graze boxes is something to think about… but as an ongoing thing, this box worked out at £1.67 for the lot.  As far as quantities go… my Florentine mix weighs in 40g, only 1g less than the Graze version… but do you know the really cool thing?  Mine is 5PP… theirs is 6PP!

Would you make your own Graze box?  What would you put in it?

* both codes are affiliated, I get £1 off my next box if you use them (I think).  Please don’t use them because now I have a cupboard-full of seeds and dried fruit to use up!

** ignoring the £5845893 I spent on tiny, tiny boxes

Weight Watchers Friendly: Chipotle Chicken Wrap

Posted by Lipglossiping On July - 8 - 2013

“Ugh, it’s too hot to cook!” says me.

“Hungry!” says everyone in the flat who doesn’t have to contemplate entering the kitchen.

The thought of even putting the oven on makes me wanna stick my head in it whilst I’m there. I’ve got all the windows open (curtains closed of course) and this has afforded me a little insight into the UK’s problem with inbreeding. The mercury rises above 25 degrees and everyone outside feels the need to raise their voices because sound doesn’t travel well through heated airwaves?

I’ve had: “Does your MUVVER know you’re buying WEED?!” shouted down the road… not once, but four times (just in-case we didn’t all hear this revelation the first time round). Followed up with what sounded like the ice-cream van having a seizure over and over and over. It’s always the same around here when the sun comes out, Mr Marucci circles these lanes like a vulture, he just won’t stop until we’ve all got fucking ice-cream headaches. And that’s without consuming a single 99er. You know the tune? We’ve always told Leila that if they play the music, it means they’ve run out of ice-cream.

I’m grumpy. Can you tell? But I’m also hungry… and I need to go to the gym later (hardcore gym bunny now). Hence, I need to eat. Without much effort… here’s what I’m making tonight.

Weight Watchers Chipotle Chicken Wrap_1

The cast of characters include:

2 Warburtons Squareish Wraps
1 cooked chicken breast, shredded
1/2 an onion, sliced
handful of frozen peppers (I always buy frozen, who can afford fresh?)
2 mushrooms, sliced
1tbsp tomato puree
2tsp chipotle paste
1tbsp natural yoghurt
1tsp olive oil
salad-y stuff

Make up your side salad first, this cooks fiercely and quickly – you don’t wanna be mucking about trying to slice tomatoes while the pan behind you is on fire.

Weight Watchers Chipotle Chicken Wrap_2

Heat a tsp of olive oil in a frying pan and add the vegetables, stir-frying quickly over a high heat until well-softened.

Weight Watchers Chipotle Chicken Wrap_3

Add the tomato puree and chipotle paste, return to the heat and combine everything evenly before adding the ready-cooked shredded chicken to warm through.

Weight Watchers Chipotle Chicken Wrap_4

Remove from the heat and spoon over a tablespoonful of natural yoghurt for a touch of creaminess.

Weight Watchers Chipotle Chicken Wrap_5

Divide into two portions and spoon into your wrap. Serve with your side salad and enjoy!

Weight Watchers Chipotle Chicken Wrap_6

Weight Watchers Chipotle Chicken Wrap_7

How simple is that? Probably too bloody simple to bother with a blog post about it but it was either this or order something from Dominos, which we know wouldn’t be Weight Watchers friendly! As far as the points go, this came in at a truly wonderful 7 Pro Points. Leaving plenty of points for a refreshing gin and tonic (or seven) later.

If you like Mexican flavours, a jar of chipotle paste should be a permanent staple in your fridge…. you get all that wonderful smokey Mexican flavour without the heat… and let’s face it, who needs anymore of that today?

Let me know if you try this one out! What do you cook on days when you just wanna declare the kitchen a dead-zone?


Making vegetables tastier: Broccoli Tots

Posted by Lipglossiping On June - 27 - 2013

5 a day. Do you?

I don’t… although God loves a tryer.

The problem with vegetables is that they’re just alright.  I’m simply not gonna get excited over a carrot in the same way that I get excited over a slice of cheesecake.  Thems the breaks veg… you don’t make me want to eat you, it’s your fault, not mine.  Have you ever thought about that?

And so, in my endless quest of ways in which I can make vegetables tempt me… I wanted to make a slightly-more-healthy version of my much-loved courgette fritters… except, with broccoli, baked rather than fried.  ‘Cos that’s what I had.  Lots and lots of slightly-yellowing broccoli bought with the best of intentions.

Here’s what I did:

Broccoli Tots_01

The cast of characters included:

2 medium-sized heads of Broccoli (don’t de-stalk this too vigorously)

1.5 cups breadcrumbs (I used Weight Watchers Malted Bread – 3 slices, Panko would be great!)

30g grated parmesan (I love the Lidl one)

A generous squirt of English Mustard

1 medium egg

3 Tbsp egg whites (or just use another medium egg if you’re not points counting!)

1 tsp garlic paste

3/4 tsp smoked chilli flakes (you can substitute this for any seasoning you’d prefer)

Preheat the oven to 190 degrees celsius (180 fan)

Begin by chopping the broccoli into small, less than bite-size pieces and steam them for a couple of minutes until tender.  Once cooked, add all the ingredients one by one, mixing as you go to ensure you get everything evenly combined.

Broccoli Tots_02

Take a bun tray/muffin tray or similar (I use this 12-cup one from Asda) and give it a light spray with cooking oil.  Use your hands to gently shape the mixture into golf-ball sized balls and place into the hollows of your bun tray.

The mixture should feel quite wet, the broccoli tots will spread a little whilst cooking but retain their shape within the hollow.

Broccoli Tots_03

Bake on the middle shelf for 15-minutes then remove from the oven and flip each tot over.  Pop back in the oven for another 10-15 minutes.

Broccoli Tots_04

Broccoli-Tots_05

The beauty of these veggie tots is that I’m already thinking of all the other vegetables I could cook like this.  I would love to do bubble and squeak… something which I LOVE but can never get brown and crispy in a frying pan.

The parmesan was great but I think I might try it with a bit of reduced fat mozzarella next time… or even a sprinkle of my beloved blue cheese.

As far as the Pro Points go… these worked out at 2 Pro Points per three tots or nine points for the whole tray of twelve!  Not bad for a plate-filling side.  If you’re up for a bit of batch cooking, these will also freeze beautifully, just heat  them up from frozen in the oven at around 200 degrees for 15-minutes and they’re perfect.

What are your favourite ways of making vegetables more tempting?

A baking classic! Layered sponge with jam and buttercream

Posted by Lipglossiping On April - 29 - 2013

As much as I want to call this a Victoria Sponge, traditionally… it’s not. You see, a Vicky Sponge contains jam and it’s only heathens like me who would dare to add a layer of (not-even-fresh-cream) buttercream to the proceedings.

However, I made my brother some cupcakes for his birthday this weekend and as such, I had some leftover buttercream that I couldn’t allow to go to waste.

IMG_8924

The sponge is a classic, though not always the easiest to get right. In theory, the best results are obtained through a delicate balance of gradual ingredient adding and mixing… no good can surely come of lumping everything in the same bowl and turning on the mixer. Except, I am not a patient cook and always favour the one-step method.

The most failproof version of which, is one my Nan always referred to as an 8s and 4s. You should be able to see why when you read the ingredients list:

225 g (8 oz) butter (room temperature)
225 g (8 oz) caster sugar
225 g (8 oz) plain flour
4 large eggs
2 tsp baking powder
2 x 8″ greased and lined sandwich tins

IMG_8932

Preheat the oven to 180 degrees celsius and grease/line your two sandwich tins.  I usually either grease and flour or grease and add a disc of parchment paper to the base of each tin.  Place all the ingredients into a large mixing bowl and turn on your hand-mixer, slowly at first before building up the speed until everything is well-combined.  I beat the ingredients for no more than a few minutes.

Divide your mixture evenly between the two tins and lightly push the mixture out toward the edges of the tin with a spatula.  Bake in the oven for around 22-25 minutes but check regularly from around the 16 minute mark.

Allow the cakes to cool in their tins for 5 minutes before turning out onto a cooling rack and peeling off the parchment paper.  Leave well alone until thoroughly cooled.

IMG_8942

When your cakes have cooled, spread one layer with your buttercream (I won’t give you a recipe but I do have a soft spot for the Hummingbird bakery one) and the other with the jam of your choice.  I love the Lidl jams which are more like preserves, raspberry is traditional for this style of cake but I used blackcurrant which was honestly, a little too robust and tart in this instance.  Combine the layers and lightly dust the top of your cake with icing sugar.

What was the last cake you made?

My French Pharmacy/Supermarket Haul (skincare and more!)

Posted by Lipglossiping On April - 2 - 2013

I spent every Summer in France as a teenager, so it was lovely to be able to rediscover some of my old haunts, particularly down the aisles of the nearest Super U.  My first stop wasn’t for skincare, but haircare.  My obsession with Dop shampoos has been a long-lasting inexpensive love affair which my poor Mother has to tend to every-time she returns to France in the Summer with a shopping list longer than her own!

French Buys_01

This time around I decided to treat my dry hair to some of their more moisturising shampoos in the shape of their Argan-oil and Shea Butter-enriched formulas.  Ignore the 2-in-1 labels, I never actually use these without a separate conditioner.  The bottle on the left is their original formula, I find that all of these shampoos are less stripping than many of their UK counterparts, plus the 400ml bottles last forever!  I paid around £1.40 per bottle.

French Buys_02

For conditioning, I picked up two Le Petit Marseillais products, one enriched with Shea and Argan, and one with Shea and Honey.  Both have been made for dry, frizzy hair-types and cost around £2 / £3.50 respectively.  All of the above I bought at Super U, our local French supermarket.

French Buys_03

Next, I moved on to the pharmacies.  Outside of Paris, there’s less choice in the brands available and they tend to vary from pharmacy to pharmacy.  Our local supermarket has it’s own rather wonderful para-pharmacy attached so I didn’t have to venture too far but I still couldn’t get my hands on any Embryolisse (I wasn’t surprised, I’ve never been able to in the past outside of major cities), or more disappointingly, Avibon – of which I was told they are currently experiencing a nationwide shortage!

I did, however, manage to pick up a tube of Homeplasmine which Mr. L uses on his lips when they’re cracked.  It’s a great alternative for anyone who dislikes the feeling of balms as it doesn’t feel remotely claggy or heavy with more of a matte texture.  It’s also great for sore, post-sniffles noses, and cuts and bruises and is priced at around £3.75 for a small tube.  My final pharmaceutical purchase was for Leila and is something I always get Mum to pick up for me in lieu of Calpol!  Doliprane is France’s generic kid’s paracetamol and dosage is measured by the child’s weight rather than their age, making it far more effective (in my opinion) at bringing down fevers.  It costs around £2 a bottle.

French Buys_04

I bullied myself into trying some new skincare products, desperate though I was to stock up on the old faithfuls.  I’m quite proud of myself that I didn’t come back with more than this!  My skin is still pretty dry and the change of water/travelling has made it quite finickity.  You may notice a bit of a Zinc theme running through my choices, blame my Dad… he’s a bit of a skincare tart (thanks to his eczema not vanity!) and led me in the direction of these tantalising treats.  What a great Dad I have!

I opted for a full set of skincare from makeup removal to cleansing, toning and moisturising.  I’m currently undergoing another round of IPL for facial hair removal, so tailoring my choices for irritated skin seemed like a good idea.

I went for: Uriage Anti Irritation Cleansing Gel (approx. £7.50), Bioderma Atoderm PO Zinc Ultra Soothing Creme (just under £10.00), a supermarket cheapie micellaire for eye-makeup removal in the shape of Mixa Eau Nettoyante Apaisante (£3.00), and La Roche Posay’s Serozinc which I’m hoping will provide additional cooling/calming after my lasering (£5.00).

French Buys_05

As if I could forget the chocolate (or the wine, but that’s a whole other post!)

The French seem to have a greater appreciation for salty caramel chocolate than we do in the UK.  Crunchy, smooth, chewy, silky… all textures are catered for… I reined myself in a little but could have returned with far more than what you see above!

What do you think of my buys?  Anything you’d like to try for yourself?

Food Friday: Halloumi Kebabs

Posted by Lipglossiping On March - 29 - 2013

I’m a bit of a kebab monster.  Doner, Shish, Kofte… chicken, lamb, vegetable… I love them all.  It’s an illness.  Nowadays, I restrict the doner love for those times when copious amounts of alcohol have been consumed and I can’t taste the belly-buttons.

But how about cheese?  Cheese kebabs.  You’re salivating aren’t you?

Halloumi Kebabs_01

I’m not going to write out a recipe because it’s pretty obvious how to construct a cheese kebab.  Get some cheese, string it on a skewer and add some vegetables so that you don’t only have cheese on it.  Tempting though it is.

Halloumi is pretty brilliant for this, infact… I wouldn’t recommend using anything else.  Especially don’t use Dairylea triangles, nothing good will come of it.  My halloumi comes from Asda and has chilli in it for a little added kick.

Halloumi Kebabs_02

What other vegetables work well skewered?  I used: courgette, cherry tomatoes, red onion, and mushrooms.  I’m sure I missed something really obvious…

Halloumi Kebabs_03

Baste the kebabs with some kind of marinade (I used sweet chilli) before popping under the grill for around 10 minutes, turning ocassionally so they don’t catch fire.

I served my Halloumi Kebabs with a mini-tortilla and some salad.  If you’re following Weight Watchers, you’ll be interested to know that this meal (with half the pack of cheese and a mini-tortilla wrap) came out at 14PP.  Who says you can’t eat kebabs and lose weight?

Halloumi Kebabs_04

Do you like kebabs?  We probably can’t be friends if you don’t.

A Weight Watchers Easter Treat: White Chocolate & Lemon Biscotti

Posted by Lipglossiping On March - 25 - 2013

I first realised that I could make my own biscotti after reading Meg’s recipe for her Christmas DIY series, it simply hadn’t dawned on me that it would be anything other than horrendously complicated to make.  Moments before making it, I even tweeted again… just to double check that I wasn’t about to embark upon a biscuity (biscotti, gettit?) nightmare.  The responses were positive, biscotti is indeed, easy to make.

Which is why I’m sharing this diet-friendly version as part of this week’s Weight Watcher’s challenge.  The brief was simple: “Eggscellent Easter Treats – Rather than succumb to high ProPoint sweet treats that could derail your weight loss, why not use your knowledge of the Weight Watchers plan to whip up something plan-friendly instead?”

That’s fine.  I’m still going to eat my body weight in hot cross buns… no-one can stop me, I’m sorry.  Hot cross buns are my favouritest things in the whole world.  You can keep your easter eggs, your Cadbury’s Creme Eggs, your roast legs of lamb, and even your simnel cake… I’m not interested.  It’s all about the Hot Cross Buns.  Served at room temperature with cold, cold butter.  Oh god.

QUICK!  BUNS OUT, BISCOTTI IN…

Lemon and White Chocolate Biscotti

the cast of characters

My second favourite thing (after hot cross buns), is lemon cake.  Lemon anything really… the clean flavour really tickles my taste-buds.  Considering I’m going for an Easter-themed treat, my health(ier) alternative needed to pay hommage to the life-giving force otherwise known as chocolate.  So here we are, White Chocolate & Lemon Biscotti courtesy of www.cookinglight.com (but somewhat modified by yours truly).

You’ll need (makes approximately 32 biscotti at 2PP-a-piece):

3/4 (150g) cup sugar
3tsp grated lemon rind
1tsp vanilla extract
1tsp lemon extract
2 large eggs
1 2/3 (200g) cups all-purpose flour
1tsp bicarbonate of soda
1/4tsp salt
1 1/4 cups (170g) white chocolate, chopped
Cooking spray or a Silpat mat

1.  Preheat oven to 150° celsius and prepare your baking sheet by covering it with a silpat mat / spraying it with non-stick cooking spray (or grease and lightly dust with flour).

2.  Add the first five ingredients to a large bowl and mix until well blended.  Combine the flour, bicarbonate of soda, and salt and gradually add them to the sugar mixture, beating until well blended. Stir in the chocolate.

3.  Turn the (wet) dough out onto the baking sheet and shape it into two (12-inch-long) rolls; pat to 2-inch width.  You may need to flour your hands, it’s quite messy… just keep working the mixture into shape.  These will spread quite a lot as they cook, so beware that you’ll need to allow space on the sheet for this OR use two baking sheets on different shelves.

4.  Bake at 150° for 30/35 minutes. Remove the rolls from the baking sheet(s) and let them cool for 10-minutes on a wire rack.

5.  Cut the rolls diagonally into 1/2″ slices. Place them, cut sides down, back onto the baking sheet and bake at 150° for 10-minutes.  Turn the biscotti over and bake an additional 10-minutes on the other side.  Remove them from baking sheet and allow them to cool completely on wire rack.  The biscotti will harden as they cool.

Lemon and White Chocolate Biscotti

a hint of lemon with chunks of white chocolate

Lemon-and-White-Chocolate-Biscotti

I don’t like black coffee, this was purely for the photo. Someone needs to fix their nails.

Lemon and White Chocolate Biscotti

about 1/8th of the finished quantity. We’re gonna beeescotti sick of biscotti!

What’s your favourite Easter indulgence? Will you be attempting to side-step the chocolate treats for healthier alternatives this year?

* I am a Weight Watchers blog ambassador and my links to their website are affiliated.  I have received no payment for this post.

RANDOM

Now's the time to dip your toes...

I first realised that I could make my own biscotti after reading Meg’s recipe for her Christmas DIY series, it simply hadn’t dawned on me …

Urban Decay Magic Bus NOTD

I first realised that I could make my own biscotti after reading Meg’s recipe for her Christmas DIY series, it simply hadn’t dawned on me …

Soap just got more interesting...

I first realised that I could make my own biscotti after reading Meg’s recipe for her Christmas DIY series, it simply hadn’t dawned on me …

Lipglossiping New Year Giveaway - Day 21

I first realised that I could make my own biscotti after reading Meg’s recipe for her Christmas DIY series, it simply hadn’t dawned on me …

NYX Round Lipsticks - Swatches

I first realised that I could make my own biscotti after reading Meg’s recipe for her Christmas DIY series, it simply hadn’t dawned on me …

The Lipstick League – week of 12.9.11

I first realised that I could make my own biscotti after reading Meg’s recipe for her Christmas DIY series, it simply hadn’t dawned on me …

Chocolate Chip Rock Cakes

I first realised that I could make my own biscotti after reading Meg’s recipe for her Christmas DIY series, it simply hadn’t dawned on me …

LUSH Snake Oil Scalp Massage Bar

I first realised that I could make my own biscotti after reading Meg’s recipe for her Christmas DIY series, it simply hadn’t dawned on me …

Glitter Gal Hot Chilli Holographic NOTD

I first realised that I could make my own biscotti after reading Meg’s recipe for her Christmas DIY series, it simply hadn’t dawned on me …

My (mostly) moderate Becca haul from Fragrance Direct (picture heavy)

I first realised that I could make my own biscotti after reading Meg’s recipe for her Christmas DIY series, it simply hadn’t dawned on me …

POPULAR

CLOSED: Competition Time: Givenchy Very Irresistible L'eau en Rose Perfume!

I first realised that I could make my own biscotti after reading Meg’s recipe for her Christmas DIY series, it simply hadn’t dawned on me …

CLOSED - Win it! The Body Shop Expert Brush Collection

I first realised that I could make my own biscotti after reading Meg’s recipe for her Christmas DIY series, it simply hadn’t dawned on me …

Win a gorgeous "glow" trio with prizes from Urban Decay, New CID, & Arbonne!

I first realised that I could make my own biscotti after reading Meg’s recipe for her Christmas DIY series, it simply hadn’t dawned on me …

Hello? Is this thing on?

I first realised that I could make my own biscotti after reading Meg’s recipe for her Christmas DIY series, it simply hadn’t dawned on me …

Avoid the brush off with Oral-B Pro-Expert

I first realised that I could make my own biscotti after reading Meg’s recipe for her Christmas DIY series, it simply hadn’t dawned on me …

Big savings on French Pharmacy brands, win my Escentual.com top picks!

I first realised that I could make my own biscotti after reading Meg’s recipe for her Christmas DIY series, it simply hadn’t dawned on me …

Win it! 3 EcoTools Bamboo Bronzer Brushes to win!

I first realised that I could make my own biscotti after reading Meg’s recipe for her Christmas DIY series, it simply hadn’t dawned on me …

FOTD Busting out of the comfort zone!

I first realised that I could make my own biscotti after reading Meg’s recipe for her Christmas DIY series, it simply hadn’t dawned on me …

Dear Obesity...

I first realised that I could make my own biscotti after reading Meg’s recipe for her Christmas DIY series, it simply hadn’t dawned on me …

Urban Decay The Black Palette - Photos & Swatches

I first realised that I could make my own biscotti after reading Meg’s recipe for her Christmas DIY series, it simply hadn’t dawned on me …

COMMENTS

  • Categories

  • Archives

  • Admin

  • Ads